Alfa LSD Rebuild
I corresponded with Russ about this topic quite some time ago and he gave me permission
to reprint it here.
Thanks Russ, RIP.
By Russ Neely and Simon Body
I have been asked to
describe how to make an Alfa Romeo limited slip rear axle lock up better. To do
this we will double the number of internal blades (Known as clutch disks)
Figure 1) and thus the surface area of the clutch disks will give good
improvement to the limited slip. Plus it will be loose enough to work well on
the street.
All 105 / 115 Alfas (all 2000cc GTV, Berlinas and Spiders) imported to the USA from 1972 though 1994 have a
limited slip rear differential. The Alfetta, Milano and GTV-6 did not have
limited slip except for the Milano Platinum and Verde series. I understand the
Milano limited slip is similar to the Spider and that the techniques below
might be applicable.
First and most importantly, get a shop manual showing the exploded limited slip
differential. The Alfa factory loose leaf manual from the mid 1980s is readily
available as a bound reprint. Page 17-9 of that manual shows a good exploded
view (Figure 1).
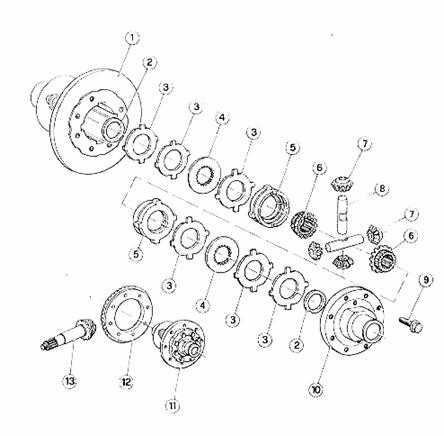
Figure 1
Follow the instructions in chapter 17 to remove the differential from the car. Elsewhere in the Digest you will find simpler instructions for removing the trailing arms and these are worth following. While you have everything apart, consider changing all the bushings to polyurethane. They are relatively cheap and provide better handling and much better wear than the original Alfa rubber bushings. With the diff placed on a secure working surface (Figure 2), remove the seven nuts attaching the driver side axle tube to the aluminum center section with a 14 mm wrench. I have also found 13 mm head nuts in this location.
Figure 2
Also remove the brake lines and the large (19 mm wrench) bolt on the upper side of the diff that goes from the passenger side through the center section of the diff into another bolt that itself goes through the "trunnion" (Big T) (Figure 3). Those two ratty pieces of bushing need to be replaced with nice new polyurethane from one of the many suppliers.
Figure 3 Figure 4
With the left axle housing removed, the ring gear and the “spider” carrier will come out easily. (Figure
4) The bearings on each end of the spider gear carrier should not be removed to
maintain the set up of the rear end. With this operation, you are changing
internal parts only. Done correctly, the clearances and alignment of the ring
gear to the pinion will not change. Thus, it can be done by a less experienced
mechanic.
Remove the eight bolts holding the end cover of the spider gear case. These bolts take a 13 mm wrench
and are the bolts closest to the bearing. Do not remove the outer circle of
bolts that attaches the ring gear to the carrier. (Figure 4)
Remove and all the parts inside the spider gear carrier. A magnet might help remove the parts bit by
bit. Keep the parts in order and study them compared to the diagram on page
17-9 of the shop manual. (Figure 5) Clean the parts with solvent.
To orient ourselves to the diff, on either side of the spider gears (called the side and planetary gears
in the manual), the stock rear end has three plates with four external blades.
These blades have a smooth surface. The rear end also has one plate or "clutch"
(called the internal blade in the manual) with internal teeth. This plate has a
rough surface and internal teeth or splines that slip over teeth on the outside
of the larger spider gear. The inside of the larger spider gear has splines
that the axle slips into.
Figure 5
Thus the stock limited slip
has three plates or "external blades" that turn with the ring gear
and one plate or "internal blade" or "clutch" that attaches
to the spider gear and thus to the axle. Friction between these plates is what
limits the slip in the diff.
I have also seen a third
type of plate. It has a smooth surface with neither external nor internal
blades nor splines. I surmise that this might have been used by the factory to
shim the rear end or to make up for manufacturing tolerances. Or it may be that
some years of rear axles have this extra plate and other years do not. So if
you have found this type of plate, it will probably be the first plate into the
spider gear carrier housing. And in this case, there will be five plates on one
side of the spider and four on the other side.
To further reduce the amount
of slippage in the differential, we will replace one of the external bladed
plates, which locks into the case of the spider carrier attached to the ring
gear. We will replace that external blade with a second internal bladed plate.
There will be a total of
four plates when we start and a total of four when we finish. When we are
finished the order of assembly of the modified "stack" will be as
follows:
1. The first part into the
case is the end bushing that touches the end of the spider. It has holes that
hold oil and a small tab that fits into a slot in the spider gear case.
2. Next comes half of the
brass shims that you will cut to tighten the limited slip. Cutting of the shims
will be described below.
3. Then comes
the first externally bladed plate. Note that the shims go between the end of
the case and the first external bladed plate. Thus there will be no turning
motion to destroy the soft brass shim.
4. Next comes
the first internally splined blade or plate or "clutch."
5. Then another external
bladed plate.
6. Then a second internally
splined plate. Note at this point that the second internal bladed plate or
clutch rubs against the spider gear carrier or pressure ring. I have not found
the wear to be excessive on this part.
7. Then comes
the spider carrier which has four V slots. The shop manual calls this part a
"pressure ring".
8. Next in the modified
assembly process comes the main spider gear. The two
internally splined plates already in the case have to have their splines
aligned for the spider to drop fully into place.
Fit the two cross bars and
four smaller spider gears as a unit. The cross bars have slots that nest on
each other. Then comes another of the larger spider
gears that the axle fits into, another V slotted spider holder, the first
internally splined plate or clutch. Note that at this point, the spider is
already in place so the internal splines in the plate nest over the spider
gear.
This is followed by an
external bladed plate, the second clutch, and the second or final external
blade, as described above. Then comes the other half
of the brass shim stack and the cover for the limited slip. Note that another
end bushing with oil holes fits into the cover of the limited slip / spider
carrier before it is attached.
Note that we replaced one
external blade or plate with an internally splined plate or "clutch."
You need to acquire two of these clutches. Note again, that on page 17-9 of the
1985 Spider workshop manual the "clutch" is identified as an
"Internal Blade."
The clutch disks are
available from the usual sources. The catalogue suppliers might not have them.
You might have to go to someone who orders from Alfa. I know Vick Auto
(VickAuto.com) can get them. The problem is, they cost
about $75 per each the last time I checked. You need two clutch disks for a
cost of $150. For $75 to 150 you can buy a used rear end and have lots of other
spare parts. In addition you will need parts from a rear end to test the
“breakaway tension” of the redone diff. The normal failure mode of a rear end
is the bearings go bad and rebuilding would cost more than buying a good used
rear end. Rebuilding an Alfa rear end is time consuming due to its design. The
local Oklahoma City Alfa mechanic refuses to rebuild rear ends as long as good
used ones are still available. The other failure mode is gear whine. My
experience is that this occurs after the rear end has been run with little or
no gear lube. The ring and pinion get damaged by the heat and will always whine
unless replaced.
Since a noisy or junk rear
end is all that is needed, the cost should be free or minimal. So buy one and
remove the clutch disks to use in your diff.
There is some controversy
about the best way to make the limited slip work best. My limited slips have
been put together tight. Just cut shim stock of whatever thickness the case of
your LSD requires. The shims go into the case first between the end of the case
and the first "external blade" disk. There will be only pressure on
the shim stock - there is no turning movement to wear the shim stock since it
is at the end of the case. Shim the stack on both ends until the cover will
just barely still go on.
You will need 0.030 to 0.040
inches of shim stock in total. The shim stock I used was purchased in 0.003,
0.005 and 0.008 inch thicknesses. Cut a circle of shim stock and cut a hole in
the center. Use one of the blades as a pattern.
To measure the breakaway
tension, cut off the inner end of an axle shaft – see, you need parts from a
spare rear end anyway. Weld an old socket to the end of the stub axle. Put the
assembled center section of the rear end in a vice and use a torque wrench on
the stub axle to measure the torque required to turn the spider gears. With a
bit of gear lube on all the disks or blades, adjust the torque required to turn
the spider gears. This could be anywhere from a minimum up to 100 foot pounds
or more if you are really intense.
Figure 6
Remember, the tighter the break away torque, the more the rear end will wear in use.
Plus a really tight LSD can act like a locked rear end and cause
your Alfa to plow or understeer. The LSD will eventually loosen up as the car
is driven. Any stock Alfa with 10,000 miles or more will appear to not have a
limited slip if you jack up the rear axle and turn one wheel. However, you
should still be able to make it lock up by accelerating hard. To maintain a
really tight rear end you will need to reshim the diff every year or two,
depending on your driving.
The other way to improve lock up, which I have not tried, is to change the angle of the V where the
shafts for the spider gears rest. Changing the angle of the V will change the
leverage applied to the clutch pack and make it lock up quicker. Since the
parts are not installed tight, wear will occur only when the LSD is working.
I think that is about it. In summary, just doubling the clutch disks will give the most improvement with the
least wear on the components.
Ciao,
Russ Neely